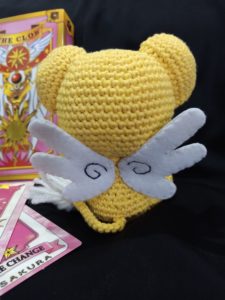
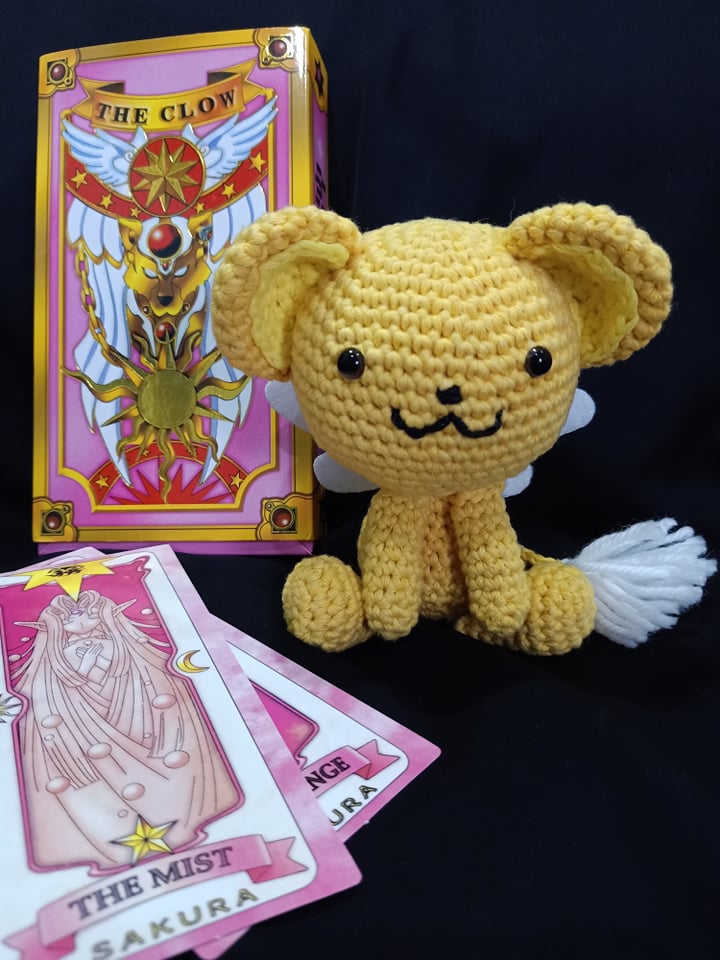
Keroberos is a character in my favorite 90’s anime series Cardcaptor Sakura.
When my son gifted me with a deck of Clow cards, I thought they would need a guardian. I chose this form because it’s cute.
As a way of saying thanks, do consider buying me a cup of coffee when you download this free pattern.
Here’s the pattern
Materials:
Lightweight yarn in dark yellow (main color)
Lightweight yarn in light yellow
Small amount of black yarn
Small amount of white yarn
Black and white sewing thread
3.75mm hook
8mm safety eyes
White hard felt cloth
White soft felt cloth
Sewing needle
Tapestry needle
Stitch marker
Craft scissors
Notes:
Each part is worked in continuous round so use the stitch marker to mark the start of each round.
Use the main color for all parts except the inner ear and the pompom tail.
This toy is not intended for young children.
Stitches used:
MC – magic circle
ch – chain
sc – single crochet
inc – 2sc in the stitch
st – stitch
dec – 2sc together
FO – fasten off
HEAD
RD1- 6sc in magic ring
RD 2- Inc in each sc (12st)
RD 3- *Sc, inc ; repeat * around (18st)
RD 4- *Sc2, inc; repeat * around (24st)
RD 5- *Sc 3 inc; repeat * around (30st)
RD 6- *Sc 4, inc; repeat * around (36st)
RD 7- *Sc 5, inc; repeat * around (42st)
RD 8 -*Sc 6, inc ; repeat * around (48 st)
RD 9-17- sc in each sc (48 st)
YOU MAY PUT THE SAFETY EYES AT THIS POINT BETWEEN ROUNDS 9 AND 10, ABOUT 9 STITCHES PART
RD 18- * sc 6 , dec; repeat * around (42 st)
Rd 19 -* sc 5,dec; repeat * around (36 st)
RD 20-* sc 4 dec ; repeat * around (30 st)
STUFF AS YOU GO
RD 21 – *Sc 3, dec ; repeat * around (24 st)
RD 22 – *Sc 2, dec ; repeat * around (18st)
RD 23 – *Sc, dec ; repeat * around (12)
RD 22- dec six times (6 st)
FO with long tail
Use a tapestry needle to sew the hole shut.
Ear (make 2)
RD1: 6 sc into ring (6 sts)
RD 2: inc in each sc (12 sts)
RD 3: sc 1, inc; repeat around (18 sts)
RD 4: *sc 2, inc; repeat * around (24 sts)
RD 5-8: sc in each sc around (24 st)
FO leaving a long tail for sewing
Inner ear (Make 2)
With light yellow, chain 2
RD 1: 3 sc in the second chain from hook, ch 1, turn (3 sts)
RD 2: inc in each sc, ch 1, turn (6 sts)
RD 3: 1 sc, inc; repeat across, ch 1, turn (9 sts)
RD 4: 2 sc, inc; repeat across, ch 1, turn (12 sts)
RD 5: 3 sc, inc; repeat across, ch 1, turn (15 sts)
FO leaving a long tail for sewing
Sew these on the ears.
BODY
RD 1 – 6SC IN MC (6st)
RD 2 – 2sc in each sc (12 st)
RD 3 – *Sc, inc ; repeat * around (18 st)
RD 4 – *Sc 2, inc ; repeat * around (24 st)
RD 5 – *Sc3, inc ; repeat * around (30 st)
RD 6 – 9 – Sc in each sc (30 st)
RD 10 -*Sc 3 dec ; repeat * around (24 st)
RD 11 – Sc in each sc (24 st)
RD 12 – *Sc 2 dec ; repeat * around (18 st)
RD 13 -15 – Sc in each sc (18 st)
FO leave a long tail for sewing
Stuff with fiberfill
Arm (make 2)
RD 1 – 6SC IN MC (6 st)
RD 2 – sc 2, inc (2times) (8st)
RD 3-10 sc in each sc around (8st)
FO leaving a long tail for sewing
Stuff with fiberfill about ¾ full
Add more rows if you think the arm is too short. Whatever works for you.
Leg (make 2 )
Chain 5
RD 1 – sc in second chain from hook and in the next 3 chains; continue on the other side of the chain, sc in each chain ( 8sc)
RD 2 – inc in each sc ( 16 st)
RD 3 – 5 sc in each sc around
RD 6 – sc in next 4 st; dec (4x) sc in last 4sc ( 12 st)
RD 7 – sc in next 4 st; dec (2x) sc in last 4sc ( 10 st)
RD 8 – 11 – sc in each sc around (10st)
FO leaving a long tail for sewing
Stuff the leg about ¾ full
TAIL
With white yarn, make a pompom. Search for pompom tutorials online if you are not familiar with making one.
With main color, chain 15 (add more chains if you want a longer tail)
attach the pompom
slip stitch in each of the chain
FO leave a tail for sewing
Using the pictures as a reference, embroider the nose and mouth.
Sew the different parts using the tapestry needle.
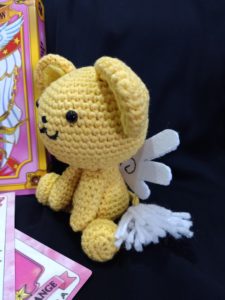
WINGS
It was a freehand drawing and you may have to gauge the size that is appropriate for your doll.
Trace and cut 2 sets on hard and soft felt cloth.
Sew one hard and one soft felt wing together with white sewing thread. Do this for the second wing.
Embroider the wing detail with black sewing thread.
Sew to the back of the doll.